Ground Control Points (GCPs) are simple markers distributed throughout the field, with accurately measured coordinates used to georeferenced aerial or satellite imagery.
They play a crucial role in achieving accurate spatial positioning and correcting image distortions, enabling precise analysis, mapping, and interpretation of remotely sensed data. In the context of Field Trials, GCPs bring additional value by significantly facilitating the drawing and copying of annotations. Since trial fields often contain a large number of annotations (depending on the number of plots/stripes), GCPs ensure that copying annotations from one field to another can be done in just a few clicks, without the need for manual corrections.
👉 It is also important to note that for the Plot Height analysis (as part of the Field Trials product), the use of GCPs is a mandatory step to ensure accurate results.
Beyond trials, GCPs are a fundamental element of precision agriculture workflows:
- They improve the accuracy of Agremo AI analyses and vegetation indices
- They enable consistent monitoring across different flights, dates, or sensors.
- They support variable-rate applications (e.g., fertilizers, herbicides) by ensuring treatment maps align perfectly with real-world field boundaries.
- They reduce errors in yield estimation and stand counts by aligning data layers more precisely.
- They provide reliability when integrating drone imagery with other datasets (such as satellite data or farm management systems).
Next, we will describe what the process of setting up GCPs in the field looks like, as well as how to upload data to the Agremo application.
Methodology
1. GCP marker shape
GCP markers should be in the shape of a square that looks like a chessboard (black and white). It is recommended that the marker material is not shiny, due to the reflection of the sun, it is sometimes difficult to recognize in the field. Also, it is recommended at least 50 pixels covering the markers.

2. GCP marker position
Number and position have a great impact on geo-positioning and might reduce the re-projection potential.
For users who perform multiple analyzes in the same area, it is highly recommended to choose permanent GCP positions.
Placing the GCPs, always in the same position, helps to mitigate possible geographic errors.
Here are some guidelines to consider when choosing the positions of your ground control points (GCPs):
- Corners of the field>>> Place one or two GCPs at the corners of the field to provide reference points for the entire field.
- Areas with topographic variation>>> Place one or two GCPs in areas with significant topographic variation, such as hills or valleys, to help the photogrammetry software accurately map the terrain.
- Representative locations>>> Choose one or two GCPs in representative locations that are typical of the field to provide a general reference for the photogrammetry software.
Watch a video
***
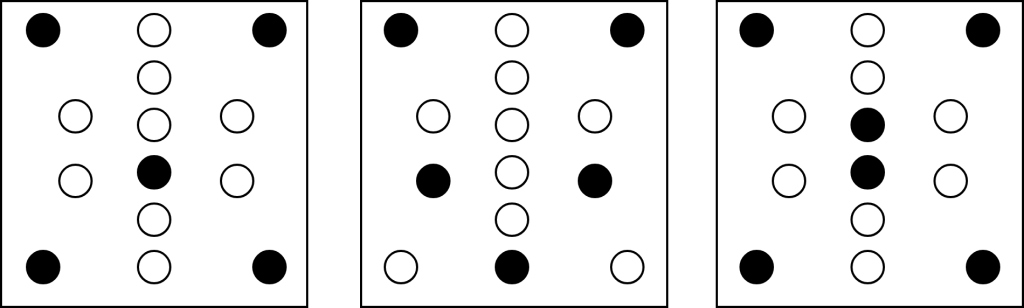
We strongly recommend using at least 6 ground control points (the higher, is better, i.e., 10 GCPs) if you use multiple types of drone sensors during the process.
The following image shows the recommended placement for 5 or 6 GCPs.
3. Data collection with centimeter-accurate equipment and GCP
If the user owns a Real-Time Kinematic (RTK; centimeter-accurate equipment), it is possible to collect geo-locations for each GCP from the drone. (e.g. DJI M3M drones).
So the following steps are:
- Place all GCPs based on the recommendations above
- Map the field
- Collect RTK position from each GCP (take pictures from the center of these GCPs)
- Follow the steps from Uploading ground control points
Uploading Ground Control Points to the Agremo application
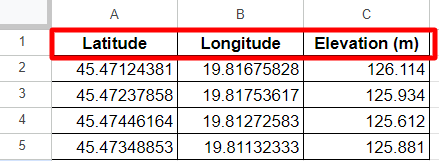
Agremo stitching platform service supports importing of ground control points GCPs via CSV file in the following format:
- Latitude
- Longitude
- Altitude (if altitude is not provided, it will be assigned from the detected marker)
The CSV file with comma-separated values should be in the same zip data set along with the raw images. Only one file should exist in the dataset.
GCP Upload can be done in two ways:
- By creating a CSV file (as described above) and adding it to the ZIP file together with the georeferenced images.
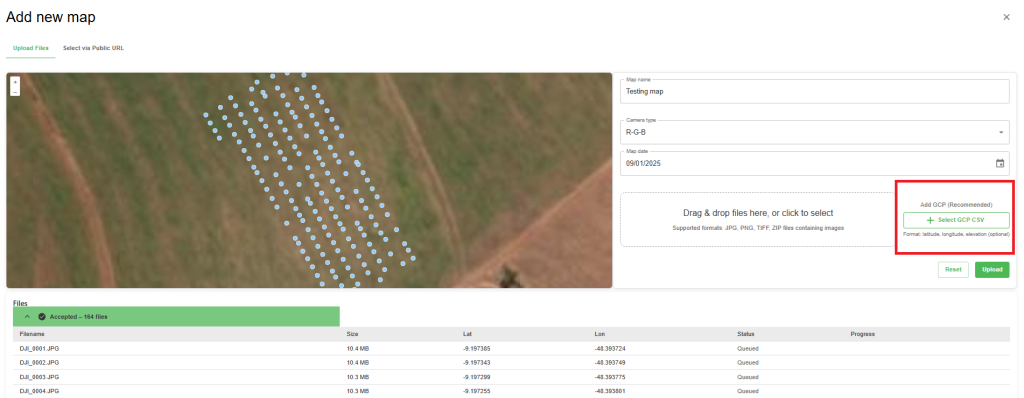
- By uploading the CSV file separately, without zipping, an additional field will appear once the georeferenced images are added.
Create an account and there are plenty of things to see even if you don’t have a map yet!
