Overview
The Modify Prescription Map tool allows you to adjust, fine-tune, or completely redesign your prescription (VRA) map directly within the platform.
This tool is available within the Spraying and Fertilizer tools, based on:
- Real-time analyses – for automatically generated analyses based on Vegetation Indices
- AI analyses – available for Weed detection and Plant Vigor analyses
With this tool, you can:
- Modify Field Area
Modify Zones
How to Access
From Real-time Analyses
- Open the uploaded Drone map
- Go to the Real-time analyses section.
- Select the Vegetation Index (e.g., NDVI, NDRE, VARI, EXG..) that you want to use to generate the Prescription Map.
- Choose either the Fertilizer or Spraying tool.
- Click on the Modify Prescription Map tool.
- The tool will appear in the bottom-right corner of the screen, and the current map will open in edit mode.
From AI Analyses
- Open the uploaded Drone map for the selected field.
- Go to the analysis results for Plant Vigor or Weed Detection.
- Click on the Tools tab.
- Choose either the Fertilizer or Spraying tool.
- Select the desired tile size to determine the level of detail in the map zones.
- Click on the Modify Prescription Map tool.
- The tool will appear in the bottom-right corner of the screen, and the current map will open in edit mode.
How It Works
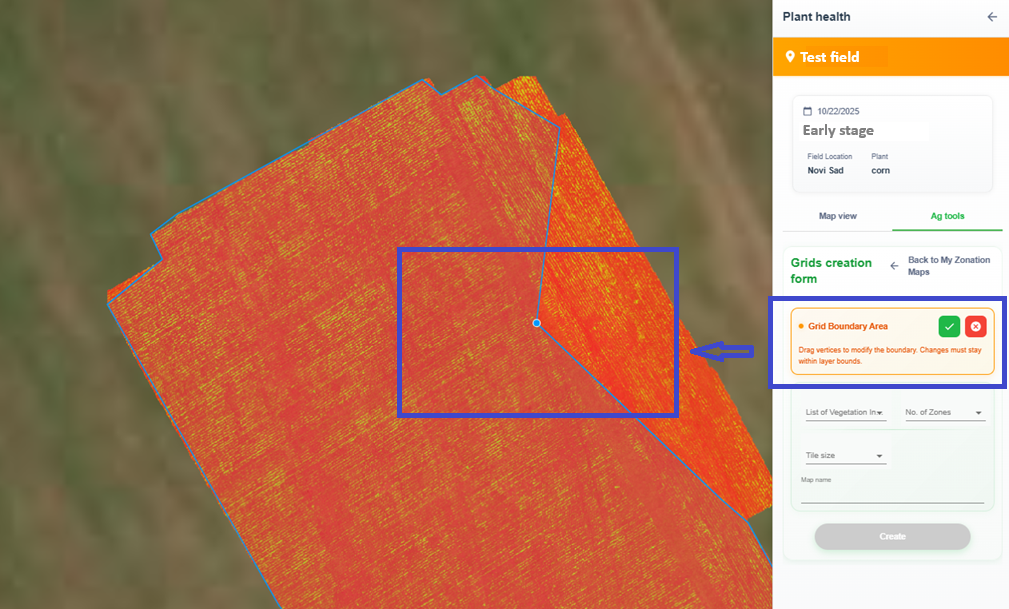
Modify Field Area
This option is available only for Real-time analyses.
- Click on the Tools tab.
- Click on Create new map.
- Choose whether you want to edit the existing field boundary or delete and draw a new one.
💡 Note: This editing applies only to the current Prescription Map. It will not affect the initial field boundary or any other analyses related to this map.
4. Once the modification is saved, a new button “Reset to Original” will appear. This option allows you to revert to the initial field boundary at any time.
5. After setting the boundary, select the desired Vegetation Index, number of zones, tile size, and Prescription Map name.
6. The system will generate a new Prescription Map based on the modified field boundary and the selected parameters.

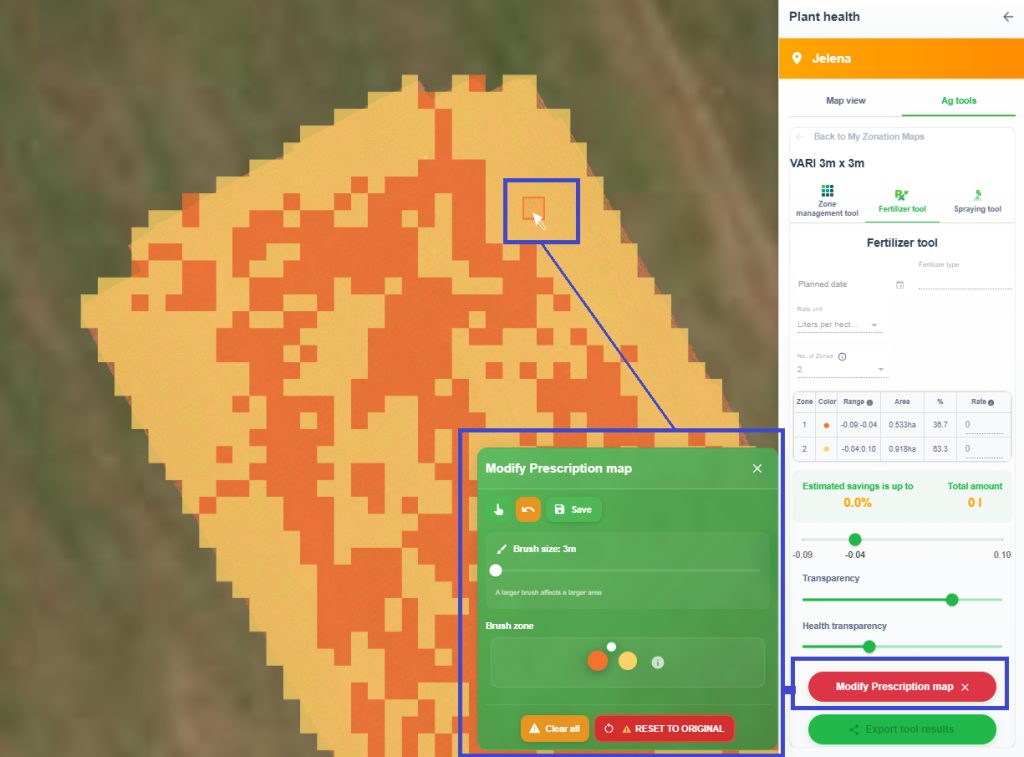
Modify Zones
This option is available for both Real-time and AI analyses.
- Open the Spraying or Fertilizer tool.
- Click on the Modify Prescription Map tool.
- Select the desired brush size and brush zone (zone color).
- Modify zones by clicking on the map or holding Shift and dragging to edit the grid cells.
- On the right side of the screen, you will find two transparency sliders (One for the Prescription Map and One for the Analysis Result). These sliders allow you to adjust the opacity of each layer, giving you a clearer view of the underlying field conditions while editing your map.
- Once finished, click Save to apply and store all changes on the map, as well as in the data table used for adding Rates and calculating Estimated Savings.
💡 Tip:
At any time, you can restore the map to its original version by clicking Reset to Original.
During editing, you can step back a few actions using the Back button or remove all changes completely with Clear All.


